Absolutely! Here is a fully expanded, in-depth article based on the prompt you provided, focusing on how to choose the best air compressor for a framing nailer under $1000 for a home garage. The article is structured with clear sections and detailed guidance, greatly expanding on each area as requested.
—
Choosing the Best Air Compressor for a Framing Nailer Under $1000 for Your Home Garage
Finding the right air compressor for your framing nailer can make a big difference in your home garage projects. If you work with wood, build furniture, or plan to renovate your home, a good air compressor is essential. But with so many options on the market, it’s easy to feel confused—especially if your budget is under $1000.
This guide will help you understand what matters most, avoid common mistakes, and make a smart choice that fits your needs.
Why The Right Compressor Matters
Not all air compressors are the same. Some are made for light tasks, like inflating tires, while others power tools like framing nailers, paint sprayers, or impact wrenches. If you pick the wrong compressor, you may find your nailer misfires, jams, or can’t keep up with your work speed.
The best air compressor for a framing nailer delivers steady airflow, reliable pressure, and is easy to use in a home garage. It should also be quiet enough for indoor use and small enough to store when not in use.
Spending under $1000 gives you many excellent choices without breaking the bank.
Key Features To Look For
When buying an air compressor for your framing nailer, focus on a few important features. These will help you avoid disappointment and wasted money.
1. Cfm And Psi Ratings
- CFM (Cubic Feet per Minute): This measures how much air the compressor delivers. Framing nailers usually need 2–3 CFM at 90 PSI. If the compressor’s CFM is too low, the nailer will not work properly.
- PSI (Pounds per Square Inch): This is the pressure the compressor can produce. Most framing nailers require 70–120 PSI. Make sure the compressor can reach at least 120 PSI.
Beginner insight: Many people only look at PSI and forget about CFM. Even if a compressor can reach high PSI, it may not deliver enough air volume (CFM) for your tool. Always check both numbers.
2. Tank Size
- Small tanks (2–6 gallons): Lightweight and portable, good for short tasks or moving around.
- Medium tanks (6–20 gallons): Better for longer jobs and less waiting for the tank to refill.
- Large tanks (20+ gallons): More air storage, less cycling, but heavier and harder to move.
For most home garages, a 6–20 gallon compressor is perfect. If you use your nailer only a few times a month, a smaller tank might be enough. If you plan to build a deck, shed, or do frequent projects, choose a larger tank.
Example: If you are framing a small wall, a 6-gallon compressor will work. For building a garage or shed, a 20-gallon tank means fewer stops to refill air.
3. Oil-free Vs. Oil-lubricated
- Oil-free compressors: Easier to maintain, lighter, and great for small garages. However, they may be louder and wear out faster.
- Oil-lubricated compressors: Last longer and run quieter but need regular oil checks and changes.
Most homeowners prefer oil-free compressors for convenience and low maintenance.
Non-obvious insight: Oil-lubricated compressors can be better for cold climates because they are less likely to freeze or have startup problems in winter.
4. Noise Level
Some compressors are very loud. Look for models with a decibel (dB) rating under 80 dB if you work indoors or in a shared space. Quiet compressors are less stressful to use and won’t disturb family or neighbors.
5. Portability
Think about where you’ll use the compressor. If you need to carry it upstairs, into a backyard, or between rooms, choose one with wheels and a comfortable handle. Stationary compressors are fine if you always work in the same spot.
6. Power Source
Most home garage compressors run on standard 120V outlets. Make sure the model you select fits your garage’s electrical supply, and avoid industrial models that require 240V unless your garage is wired for it.
7. Duty Cycle
The duty cycle tells you how long the compressor can run before needing a rest. For framing nailers, a higher duty cycle (50% or more) is useful, so you don’t have to wait for the compressor to cool down.
8. Build Quality And Warranty
Look for sturdy materials, solid wheels, and a good warranty (at least one year). Well-known brands often offer better customer support and replacement parts.

Credit: www.lowes.com
Top Recommended Compressors Under $1000
Here are some of the best air compressors for framing nailers under $1000, with reasons why they stand out for home garage use.
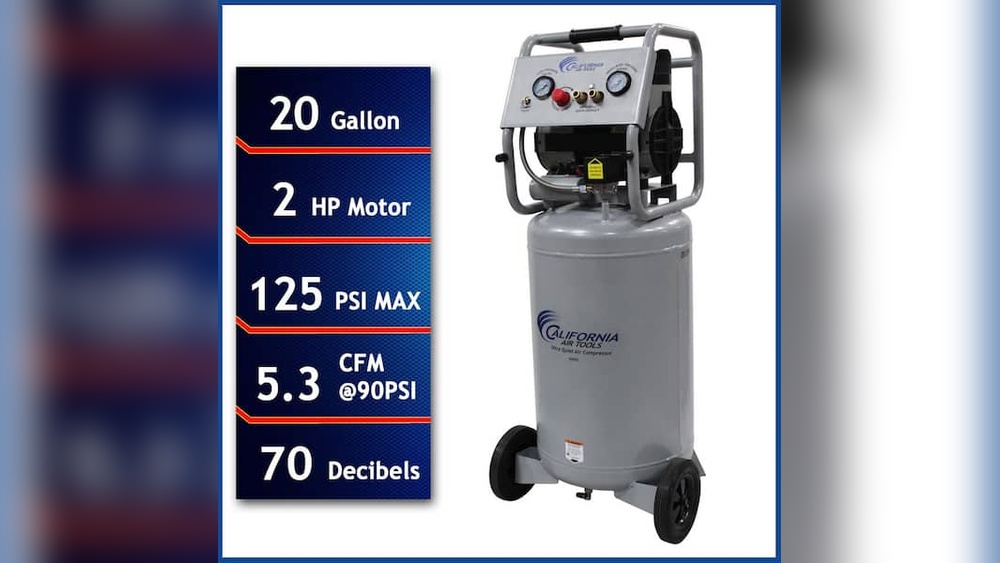
California Air Tools 10020c Ultra Quiet
- Tank: 10 gallons
- CFM/PSI: 6.40 CFM @ 40 PSI, 5.30 CFM @ 90 PSI, max 125 PSI
- Noise: 70 dB (very quiet)
- Type: Oil-free
- Why it’s great: Very quiet, so you can use it indoors. It has enough power for framing nailers and other tools. The 10-gallon tank means fewer stops for refilling.
- Drawback: Heavier than small models, but wheels make it easy to move.
Makita Mac2400 Big Bore 2.5 Hp
- Tank: 4.2 gallons (twin-stack)
- CFM/PSI: 4.2 CFM @ 90 PSI, max 130 PSI
- Noise: 79 dB
- Type: Oil-lubricated
- Why it’s great: Built to last, very reliable, and recovers quickly. Good for frequent, heavy use.
- Drawback: Needs oil checks and is a bit heavier.
Dewalt Dwfp55130 Heavy Duty Quiet Trim Compressor
- Tank: 2.5 gallons
- CFM/PSI: 3.0 CFM @ 90 PSI, max 200 PSI
- Noise: 71.5 dB
- Type: Oil-free
- Why it’s great: Lightweight, easy to store, and super quiet. Perfect for small garages or quick framing jobs.
- Drawback: Small tank isn’t ideal for long jobs or multiple tools at once.
Campbell Hausfeld Dc080500 Quiet Air Compressor
- Tank: 8 gallons
- CFM/PSI: 2.4 CFM @ 90 PSI, max 125 PSI
- Noise: 68 dB (one of the quietest)
- Type: Oil-free
- Why it’s great: Extremely quiet and lightweight for its size. Great for home use and easy to move.
- Drawback: Lower CFM, so not ideal if you run multiple nailers at once.
Porter-cable C2002 Pancake Compressor
- Tank: 6 gallons
- CFM/PSI: 2.6 CFM @ 90 PSI, max 150 PSI
- Noise: 82 dB
- Type: Oil-free
- Why it’s great: Affordable, reliable, and simple to use. Good for basic framing jobs and easy to store.
- Drawback: Louder than others and a bit slower to refill.
Common Buyer Mistakes To Avoid
- Ignoring CFM: Many buyers focus only on PSI, but if the CFM is too low, your nailer will misfire or stall.
- Buying Too Small: A tiny, cheap compressor may not keep up with a framing nailer. You’ll spend more time waiting for the tank to refill.
- Getting a Loud Model: Very loud compressors can be stressful and disturb your family or neighbors. Always check the decibel rating.
- Overpaying for Features: Some compressors include extras you don’t need, like extra hose outlets or high-end gauges. Stick to what you will actually use.
- Forgetting About Maintenance: Oil-lubricated models need regular oil checks. If you want low maintenance, choose oil-free.
- Not Checking Power Supply: Some compressors need 240V outlets. Most homes have 120V. Always check before buying.
Practical tip: Read reviews from real users who use framing nailers. Look for comments about recovery time, noise, and reliability.
How To Match Your Framing Nailer And Compressor
Different framing nailers have different air requirements. Here’s how to match your tool to your compressor:
- Check your nailer’s air needs: Look in the manual or online for the CFM and PSI requirements.
- Choose a compressor with at least the same CFM at 90 PSI: More is better if you plan to use the tool often or with friends.
- Consider future needs: If you may buy more air tools, get a bigger tank and higher CFM.
Example: If your framing nailer needs 2.2 CFM at 90 PSI, a compressor rated 3.0 CFM at 90 PSI gives you a safety margin.
Practical Tips For Use And Care
Setup
- Place the compressor on a flat, stable surface.
- Check that all connections are tight—leaks waste air and lower performance.
- Always use a hose rated for the compressor’s pressure.
- Plug the compressor directly into the wall outlet, not an extension cord (unless rated for heavy loads).
During Use
- Drain the tank after each use to prevent rust.
- Watch the gauge. Don’t run below 90 PSI for framing nailers.
- Use ear protection if the compressor is loud.
Maintenance
- For oil-free: Just keep it clean and dry.
- For oil-lubricated: Check oil level monthly, change oil as the manual suggests.
- Replace air filters as needed.
- Store indoors to prevent freezing or moisture damage.
Little-known tip: Even “maintenance-free” models last longer if you keep them dust-free and drain water regularly.
Air Compressor Safety For Home Garages
Safety is often overlooked but is very important.
- Never exceed the maximum pressure shown on your compressor or nailer.
- Release air and unplug the unit before changing hoses or cleaning.
- Keep children and pets away from the compressor.
- Don’t use the compressor in wet or damp areas.
- If you smell burning or see smoke, turn off and unplug immediately.
Extra insight: Some compressors have automatic shut-off in case of overheating. This is a good feature for home use, especially if you might forget to check during long tasks.
Frequently Asked Questions
Q: Can I use a pancake compressor for framing?
A: Yes, if it has enough CFM and PSI. Pancake compressors are small and portable but may run out of air quickly on large jobs.
Q: Is a bigger tank always better?
A: Not always. Bigger tanks store more air but are heavy and take up space. Choose a size that fits your projects and garage.
Q: How much does noise matter?
A: For most home garages, quieter is better. Look for models under 80 dB if you work indoors.
Q: Do I need a special hose for a framing nailer?
A: No, but use a hose rated for at least 120 PSI. Longer hoses may reduce pressure, so keep them as short as practical.
Q: Can I run other tools with the same compressor?
A: Yes, but check each tool’s CFM needs. Paint sprayers or sanders need more air than framing nailers.
Q: Why do some compressors cost more with the same specs?
A: Brand, build quality, warranty, and extra features (like quieter motors or better wheels) can add cost. Sometimes it’s worth paying more for reliability.

Credit: www.lowes.com
Examples Of Home Projects And Compressor Choices
- Building a Deck: A 10–20 gallon, 3+ CFM compressor works well. You can drive many nails before waiting for air.
- Remodeling a Room: A 6–10 gallon, 2.5–3.5 CFM compressor is enough.
- Small Repairs: Pancake or small hot dog compressors (2–6 gallons) are fine for quick fixes.
Real-world example: John, a hobbyist, used a 6-gallon pancake compressor for a shed. It worked, but he had to pause often for the compressor to refill. When he built a deck, he upgraded to a 10-gallon model and finished faster with fewer stops.
Where To Learn More
For deeper technical details and more comparisons, check [The Family Handyman’s Air Compressor Guide](https://www.familyhandyman.com/project/choosing-an-air-compressor/). They cover tool matching, maintenance, and troubleshooting in plain language.
Credit: www.homedepot.com
Final Thoughts
The best air compressor for a framing nailer under $1000 is one that fits your real needs, lasts for years, and makes your projects easier—not harder. Focus on CFM and tank size, not just price or brand. Consider noise level, portability, and maintenance.
Read real-user reviews and buy from a trusted seller.
Choosing well means fewer headaches, smoother projects, and a garage you enjoy working in. Take your time, compare carefully, and you’ll find the compressor that turns your garage into a true workshop.