
To attach a hose to an air compressor, connect the hose fitting to the compressor’s outlet. Ensure the connection is secure.
An air compressor is a versatile tool for various tasks, from inflating tires to powering pneumatic tools. Properly attaching a hose ensures efficient operation and safety. Start by selecting the correct hose and fittings for your air compressor. Compatibility between the hose and compressor is crucial to avoid leaks and ensure a steady air flow.
Clean the fittings to remove any debris before connecting. Secure the hose tightly to prevent accidental disconnections during use. A well-connected hose allows you to maximize the performance of your air compressor, making your tasks easier and more efficient.
Choosing The Right Hose
Selecting the right hose for your air compressor is crucial. The correct hose ensures efficient and safe operation. Several factors come into play, such as material and length. Let’s dive into these aspects to help you make an informed decision.
Material Options
Hose material affects durability and flexibility. Here are some common materials:
- Rubber: Highly durable and flexible, but can be heavy.
- PVC: Lightweight and affordable, but less flexible in cold weather.
- Polyurethane: Lightweight, flexible, and durable. Ideal for most applications.
Length Considerations
Hose length impacts the efficiency of your air compressor. Consider these points:
| Length | Best For |
|---|---|
| 25 feet | Small tasks and short distances |
| 50 feet | Medium tasks and moderate distances |
| 100 feet | Large tasks and extended reach |
Longer hoses can reduce air pressure. Choose a length that balances reach and efficiency.
Gathering Necessary Tools
Before attaching a hose to your air compressor, gather all necessary tools. This ensures a smooth and efficient process. This section guides you on what tools to prepare.
Basic Tools
Start with basic tools. These are easy to find and use:
- Adjustable Wrench: Useful for tightening fittings.
- Screwdriver: Required for securing hose clamps.
- Plumber’s Tape: Ensures a tight seal on threaded fittings.
- Work Gloves: Protects your hands during the process.
Having these basic tools ready will save you time. You will avoid unnecessary delays.
Specialized Equipment
Some tasks may need specialized equipment. These tools help with specific needs:
| Tool | Purpose |
|---|---|
| Air Hose Reel | Helps manage and store the air hose. |
| Quick-Connect Couplers | Allows fast and easy hose connections. |
| Pressure Regulator | Controls the air pressure from the compressor. |
Using specialized equipment can make the task easier. It ensures a more professional finish.
Preparing The Air Compressor
Before attaching a hose to your air compressor, proper preparation is essential. Ensuring that your air compressor is ready will make the process smoother and safer. This section will guide you through the necessary steps to prepare your air compressor.
Safety Measures
Prioritize safety when handling air compressors. Follow these simple safety measures:
- Always wear safety goggles to protect your eyes.
- Ensure the air compressor is turned off and unplugged.
- Check for any leaks or damages in the compressor.
- Work in a well-ventilated area to avoid inhaling fumes.
Initial Checks
Before attaching the hose, perform these initial checks:
- Inspect the air hose for any cracks or wear.
- Ensure the compressor tank is fully drained.
- Verify that all valves are in the closed position.
- Check the oil level if your compressor requires oil.
Properly preparing your air compressor ensures a safe and efficient connection process.
Attaching The Hose
Attaching the hose to an air compressor can seem tricky at first. But with a clear guide, it becomes a simple task. This section will help you attach the hose step-by-step. We will also cover common mistakes to avoid.
Step-by-step Guide
- Turn off the Air Compressor: Ensure the compressor is turned off and unplugged.
- Release Pressure: Open the valve to release any built-up air pressure.
- Locate the Coupler: Find the coupler on the compressor where the hose attaches.
- Attach the Hose: Insert the hose end into the coupler. Push firmly until you hear a click.
- Secure the Connection: Tug gently on the hose to ensure it’s securely attached.
- Turn on the Compressor: Plug in and turn on the compressor. Check for leaks.
Common Mistakes
- Not Releasing Pressure: Forgetting to release pressure can cause injury.
- Loose Connections: Ensure the hose is tightly connected to avoid air leaks.
- Incorrect Hose Size: Using the wrong hose size can reduce efficiency.
- Ignoring Leaks: Always check for leaks after attaching the hose.
Securing The Fittings
Securing the fittings on your air compressor is crucial for safe operation. Ensuring a tight and secure connection prevents air leaks. This helps maintain optimal performance and efficiency. Below, we break down the steps to properly secure fittings.
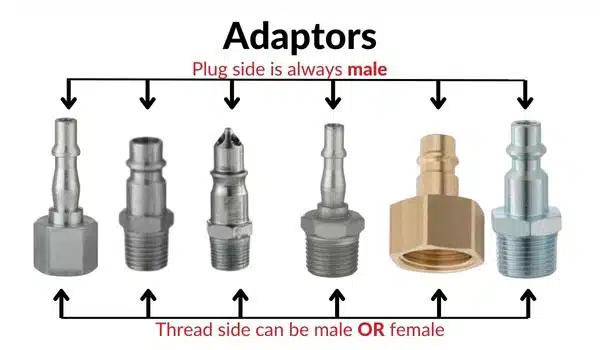
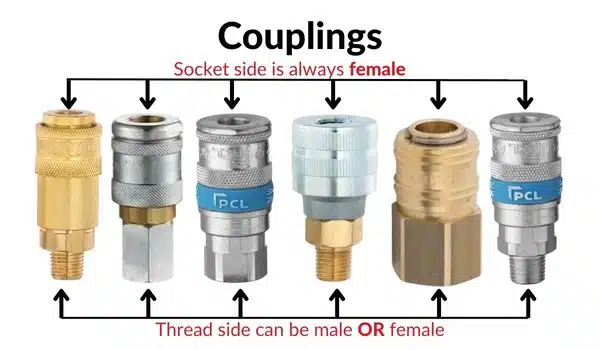
Types Of Fittings
Air compressor fittings come in various types. Each serves a specific purpose. Common types include:
- Quick-Connect Fittings: Easy to attach and detach.
- Barbed Fittings: Ideal for rubber hoses. They require a hose clamp.
- Compression Fittings: Provide a tight seal. Perfect for metal tubing.
- Threaded Fittings: Screw directly into ports. Ensure a tight fit with Teflon tape.
Proper Tightening Techniques
Proper tightening is essential to prevent leaks. Follow these steps:
- Hand-Tighten First: Start by hand-tightening the fitting. This ensures correct alignment.
- Use the Right Tools: Use a wrench for final tightening. Avoid over-tightening.
- Apply Teflon Tape: Wrap Teflon tape around threaded fittings. This helps create a better seal.
- Check for Leaks: After tightening, check for air leaks. Use soapy water to detect bubbles.
Follow these steps to ensure your air compressor fittings are secure. Properly secured fittings improve safety and efficiency.

Testing The Connection
Testing the connection is crucial after attaching a hose to your air compressor. This ensures your setup is secure and functions correctly. Proper testing can prevent leaks and maintain the desired pressure levels.
Checking For Leaks
Check for leaks to ensure no air escapes. Follow these simple steps:
- Turn on the air compressor.
- Listen for any hissing sounds.
- Apply soapy water to the connections.
- Look for bubbles forming at the joints.
If bubbles appear, tighten the fittings or apply thread sealant tape.
Pressure Testing
Pressure testing confirms that your air compressor maintains the right pressure. Follow these steps:
- Set the compressor to the desired pressure.
- Attach a pressure gauge to the hose.
- Monitor the gauge reading.
- Ensure the pressure remains steady.
If the pressure drops, check the connections again for any issues.
| Step | Action | Tools Needed |
|---|---|---|
| 1 | Turn on the air compressor | None |
| 2 | Listen for hissing sounds | None |
| 3 | Apply soapy water | Soap, Water, Brush |
| 4 | Check for bubbles | None |
Following these steps ensures your air compressor setup is safe and efficient.
Maintaining The Setup
Proper maintenance of your air compressor setup ensures efficient operation. It prolongs the life of your equipment. Regular care can prevent unexpected breakdowns and costly repairs. Let’s dive into two critical aspects of maintenance: Routine Inspections and Replacement Parts.
Routine Inspections
Routine inspections are crucial for keeping your air compressor in top condition. A simple checklist can help you stay on track:
- Check for leaks: Inspect hoses and fittings for any signs of leaks. Even small leaks can affect performance.
- Monitor pressure levels: Ensure the pressure gauge reads within the recommended range. Incorrect pressure can lead to inefficiency.
- Inspect connections: Make sure all connections are tight and secure. Loose connections can cause air loss.
- Clean filters: Dust and debris can clog filters. Clean or replace them regularly.
Replacement Parts
Sometimes, parts wear out and need replacement. Knowing which parts to replace and when is key to maintaining your setup:
| Part | Signs of Wear | Replacement Frequency |
|---|---|---|
| Hoses | Cracks, leaks, or stiffness | Every 1-2 years |
| Filters | Clogged or dirty | Every 6-12 months |
| Fittings | Corrosion or leaks | As needed |
Keeping spare parts on hand can save you time and hassle. Regularly check the condition of your equipment to ensure optimal performance.
Troubleshooting Issues
Connecting an air hose to an air compressor can sometimes be tricky. Even with the right tools, problems can arise. Below are some common issues and quick fixes.
Common Problems
- Air Leaks: Loose connections or damaged seals often cause leaks.
- Low Pressure: Obstructions in the hose or fittings may reduce pressure.
- Hose Detachment: A poorly secured hose can easily come off.
Quick Fixes
| Problem | Solution |
|---|---|
| Air Leaks |
|
| Low Pressure |
|
| Hose Detachment |
|
Frequently Asked Questions
How Do I Attach A Hose To An Air Compressor?
To attach a hose, connect the hose’s end to the compressor’s output valve. Ensure it fits securely. Twist the connector clockwise until tight. Check for leaks by turning on the compressor briefly.
What Fittings Do I Need For An Air Compressor?
You need a quick-connect fitting for the compressor and a compatible fitting for the hose. Make sure both fittings match in size and type.
How Do I Check For Air Leaks?
Turn on the air compressor and listen for hissing sounds. Apply soapy water to connections; bubbles indicate leaks. Tighten or reseal connections as needed.
Can I Use Any Hose With My Air Compressor?
Not all hoses are compatible. Use a hose rated for your compressor’s pressure and designed for air tools. Check the hose specifications before attaching.
Conclusion
Mastering the process of attaching a hose to your air compressor is essential. Follow the steps outlined for a smooth connection. Regular maintenance ensures longevity and efficiency. With this guide, you’re now equipped to handle your air compressor fittings confidently.
Enjoy seamless operations and improved performance in your projects.