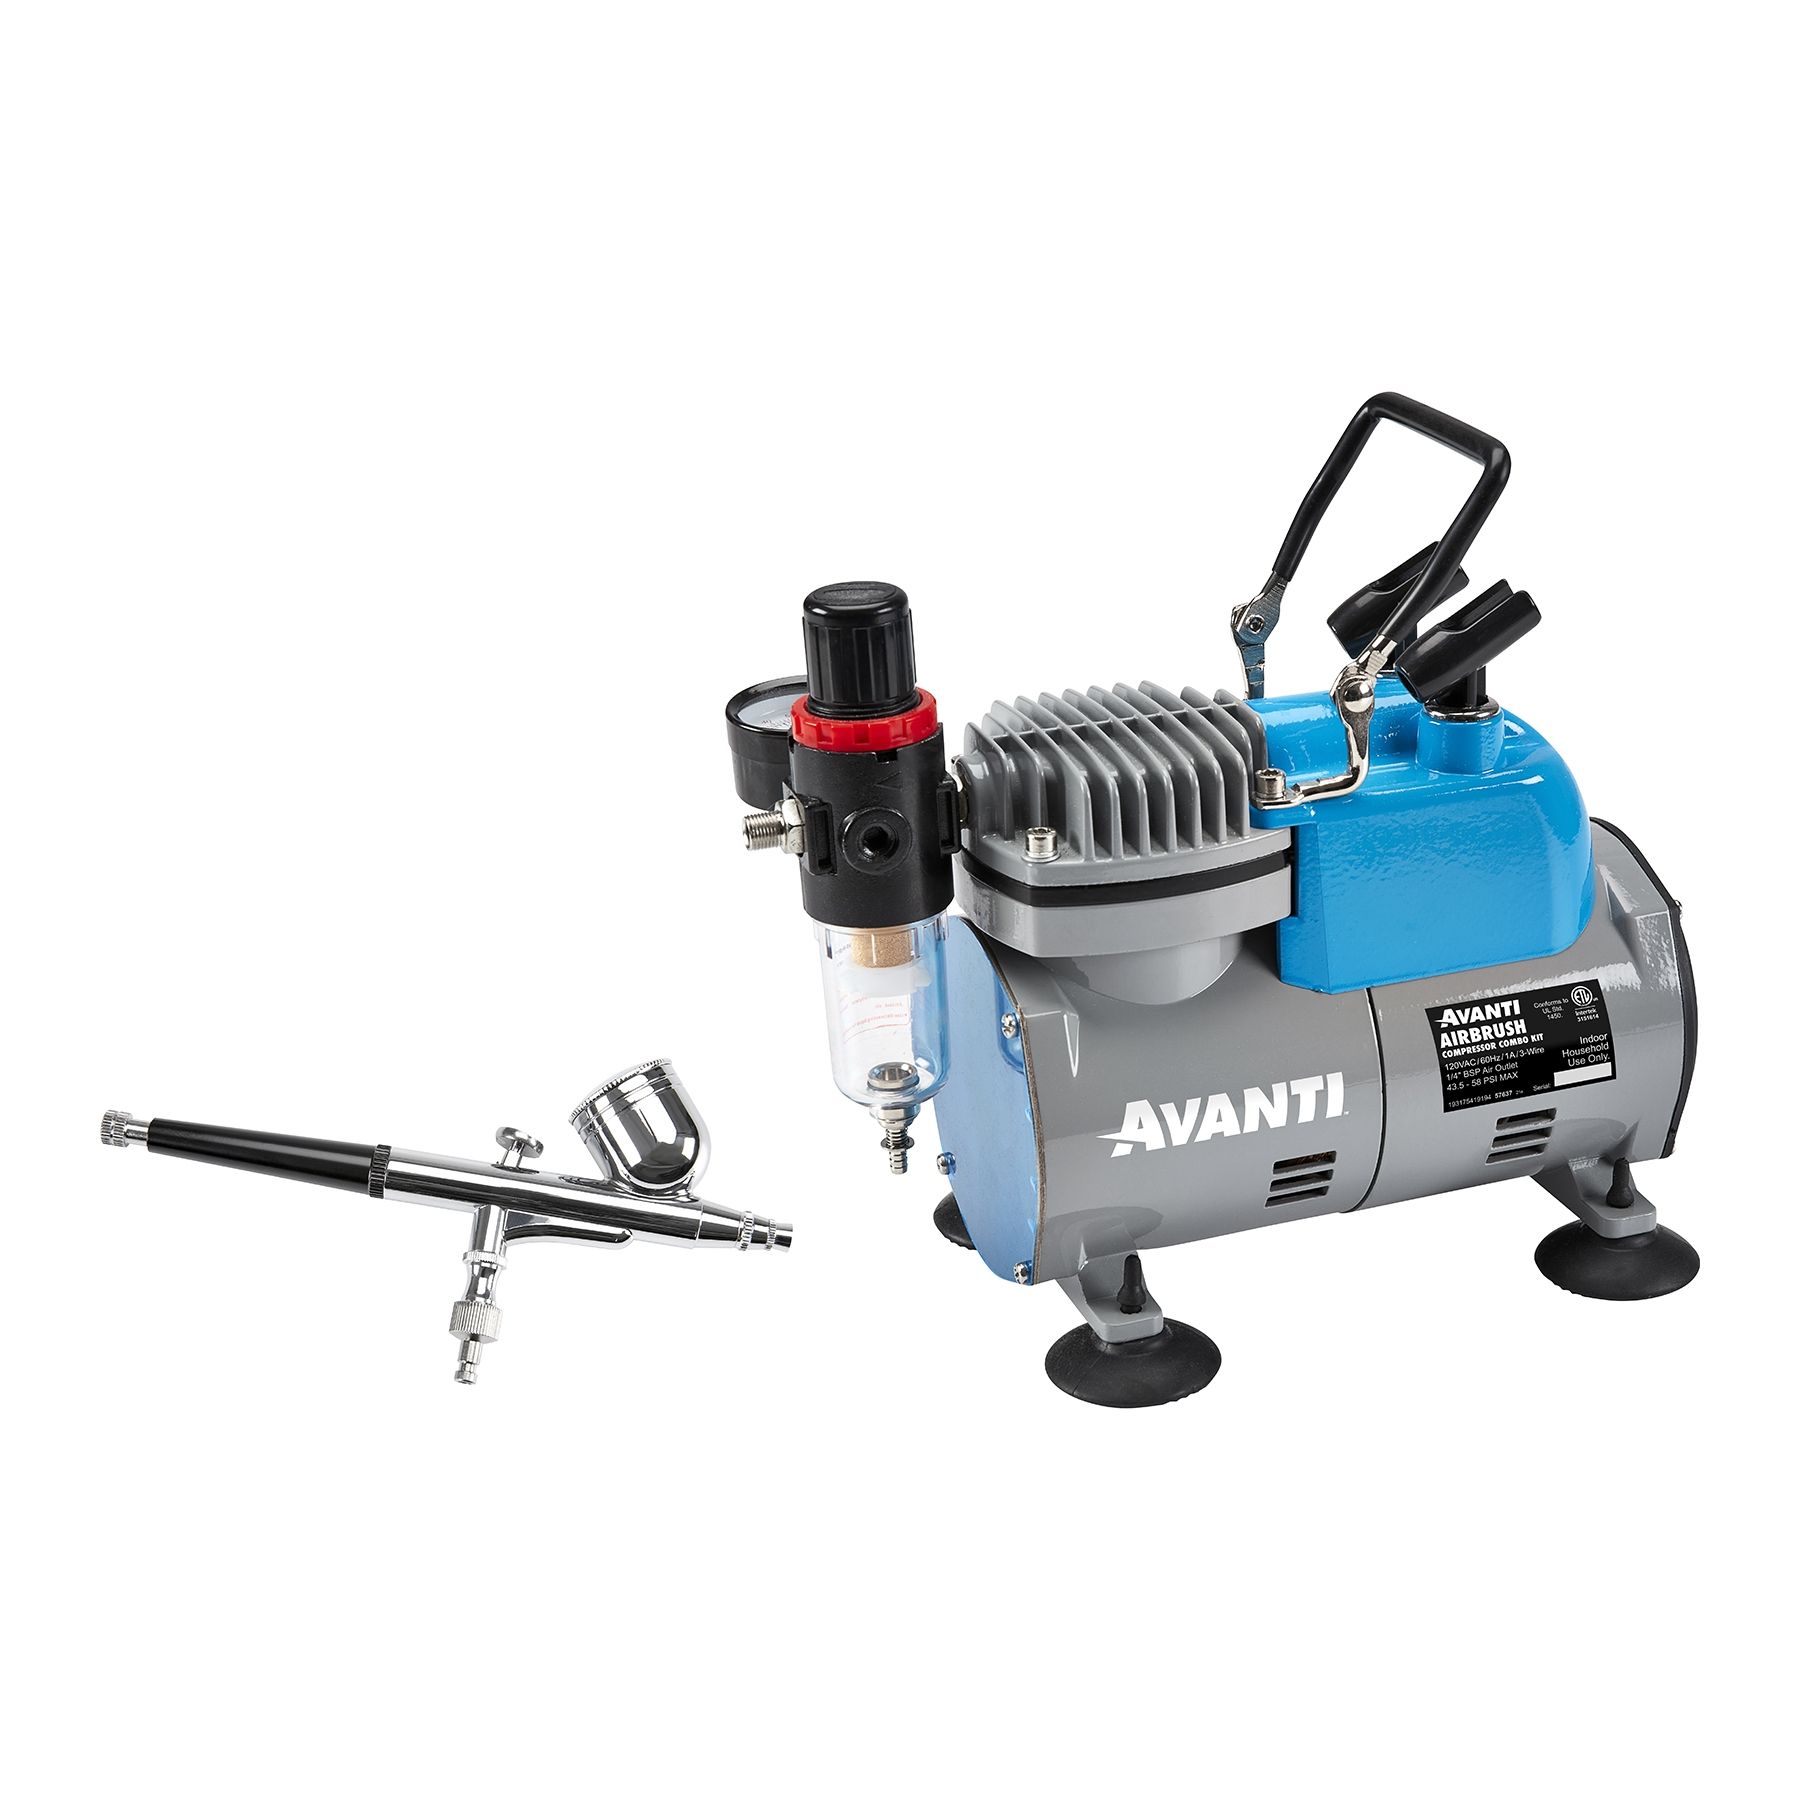
An airbrush air compressor kit includes an air compressor and airbrush tools for precise painting. These kits are essential for artists, hobbyists, and professionals seeking high-quality finishes.
Airbrush air compressor kits are vital for anyone aiming to achieve detailed and smooth designs. These kits combine a reliable air compressor with various airbrush tools, ensuring optimal performance for intricate projects. Whether you’re working on artwork, models, or makeup, the right kit enhances your creativity and efficiency.
Users appreciate the portability and versatility of these kits, making them suitable for both indoor and outdoor use. Investing in a quality airbrush kit can elevate your artistic capabilities, allowing for precision and control. Explore various options to find the perfect kit that meets your needs and enhances your skills.

Credit: www.amazon.com
Introduction To Airbrushing
Airbrushing is a unique painting technique. It uses a special tool called an airbrush. An airbrush sprays paint in a fine mist. This allows for smooth and detailed designs. Many artists love airbrushing for its precision and versatility.
The Art Of Precision Painting
Airbrushing offers incredible control. Artists can create fine lines and smooth gradients. This makes it perfect for detailed work.
- Fine Detail: Airbrushes excel at intricate designs.
- Smooth Blending: Colors blend seamlessly for a polished look.
- Versatile Mediums: Use with acrylics, inks, or even makeup.
Many professionals use airbrushes. Graphic designers, tattoo artists, and model makers benefit from this tool. Airbrushing enhances creativity and provides endless possibilities.
Airbrushing Vs. Traditional Brushwork
| Feature | Airbrushing | Traditional Brushwork |
|---|---|---|
| Control | High precision with fine lines | Varies; can be less precise |
| Blending | Smooth and seamless | Can be textured and layered |
| Speed | Quick application | Can be slower |
| Cleanup | Requires thorough cleaning | Generally easier |
Both methods have their strengths. Choose based on your project needs. Experimenting with both can improve skills.
Components Of An Airbrush Air Compressor Kit
An Airbrush Air Compressor Kit is essential for artists and hobbyists. It contains several key components. Understanding these parts will help you choose the best kit.
The Airbrush Tool: Types And Features
The airbrush tool is vital for creating fine details. Different types exist for various applications. Here are the main types:
- Single Action Airbrush: Controls air only. Paint flow is constant.
- Double Action Airbrush: Controls both air and paint flow. Offers more precision.
- Gravity Feed Airbrush: Paint cup is above the nozzle. Ideal for detailed work.
- Siphon Feed Airbrush: Paint cup is below the nozzle. Suitable for larger volumes.
Key features to consider:
- Nozzle Size: Affects detail level.
- Paint Cup Size: Impacts the amount of paint used.
- Material: Look for durable and easy-to-clean materials.
The Air Compressor: Heart Of The Kit
The air compressor powers the airbrush. It provides a steady airflow. Key features include:
| Feature | Description |
|---|---|
| Pressure Settings | Adjustable to control paint flow. |
| Tank Size | Larger tanks reduce noise and provide steady pressure. |
| Portability | Compact models are easier to move. |
Choose a compressor with low noise. A quiet model enhances your experience.
Accessories And Add-ons
Accessories can enhance your airbrush kit. Consider these essential add-ons:
- Airbrush Cleaning Kit: Keeps your tool in top shape.
- Paint Thinners: Helps with paint flow and cleaning.
- Airbrush Holder: Holds your airbrush when not in use.
- Compressor Hose: Connects the airbrush to the compressor.
These accessories improve efficiency and convenience. Investing in quality add-ons can save time.
Setting Up Your Workspace
Creating the right workspace is crucial for using your Airbrush Air Compressor Kit. A well-organized area enhances creativity. It also promotes safety and efficiency.
Choosing The Right Environment
Select a space that is well-lit and spacious. Good lighting helps you see details clearly. A spacious area allows easy movement while working.
- Avoid cluttered spaces.
- Choose a flat, stable surface.
- Ensure access to power outlets.
Consider the following factors:
| Factor | Importance |
|---|---|
| Lighting | Helps in seeing fine details. |
| Space | Allows movement and organization. |
| Power Supply | Ensures your compressor runs smoothly. |
Organizing Your Materials
Keep all your materials within reach. This includes your airbrush, compressor, and paints. Use containers or trays for better organization.
- Group similar items together.
- Label containers for quick access.
- Keep a cleaning kit handy.
Consider a dedicated shelf or cart. This helps maintain a tidy workspace. Less clutter boosts focus and creativity.
Safety First: Ventilation And Protection
Good ventilation is essential. It prevents the buildup of harmful fumes. Open windows or use a fan for better airflow.
- Wear a mask to avoid inhaling particles.
- Use goggles to protect your eyes.
- Consider gloves to keep hands safe.
Implement these safety measures:
- Ensure proper airflow in your workspace.
- Check for any electrical hazards.
- Have a first-aid kit nearby.
Getting Started With Your Kit
Using an Airbrush Air Compressor Kit can be exciting. It opens a new world of creativity. Whether you’re a beginner or a pro, understanding your kit is essential. Let’s dive into the basics of assembly, maintenance, and getting the best results.
Assembly And Maintenance
Assembling your airbrush kit is simple. Follow these steps:
- Unbox all components carefully.
- Connect the airbrush to the hose.
- Attach the hose to the air compressor.
- Plug in the compressor and turn it on.
Maintenance ensures your kit lasts longer:
- Clean the airbrush after each use.
- Check hoses for leaks regularly.
- Store the kit in a dry place.
Priming Your Airbrush
Priming is crucial for smooth operation. Follow these steps to prime your airbrush:
- Fill the cup with paint or medium.
- Press the trigger to release air.
- Watch for paint to flow smoothly.
- Adjust the paint flow as needed.
Always test with water or thinner first. This helps avoid wasting paint.
Test Runs: Getting The Feel
Test runs are essential for mastering your airbrush. Here’s how to do it:
- Use scrap paper for practice.
- Experiment with different pressures.
- Try varying your distance from the surface.
Observe how each change affects the spray. This practice helps build confidence.
Mastering Airbrush Techniques
Mastering airbrush techniques opens up a world of creativity. With an airbrush air compressor kit, artists can create stunning effects. This section explores essential techniques that enhance your skills.
Strokes And Patterns
Understanding strokes and patterns is key for effective airbrushing. Different strokes create various effects. Here are some common types:
- Straight Stroke: Creates clean lines.
- Curved Stroke: Adds fluidity and movement.
- Dot Stroke: Useful for texture and detail.
Practice these strokes on paper before applying them to your artwork. Vary the pressure for different effects. Experiment with distance to see how it impacts your strokes.
Layering And Blending Colors
Layering and blending colors creates depth and dimension. Start with a base color and build layers gradually. Here’s how to effectively blend:
- Apply a light base coat.
- Use translucent colors for layering.
- Blend edges using a soft brush.
- Dry each layer before adding the next.
Use the following tips for better blending:
| Tip | Description |
|---|---|
| Color Wheel | Use it to select complementary colors. |
| Wet on Wet | Apply wet paint on wet layers for smooth transitions. |
| Dry Brushing | Use a dry brush to soften edges. |
Troubleshooting Common Issues
Even with practice, issues can arise. Here’s how to troubleshoot common airbrushing problems:
- Paint Clogging: Clean the nozzle regularly.
- Uneven Spray: Adjust the air pressure.
- Drips: Thin the paint properly.
Keep your airbrush clean. Regular maintenance prevents many issues. Always check your paint consistency before starting.

Credit: www.harborfreight.com
Creative Projects To Try
An Airbrush Air Compressor Kit opens up a world of creativity. You can create art in many forms. Here are some exciting projects to inspire you.
Custom T-shirt Designs
Create unique T-shirts with your own designs. An airbrush allows for smooth, vibrant colors. Follow these simple steps:
- Choose a plain T-shirt.
- Select your favorite colors.
- Sketch your design lightly.
- Use the airbrush to fill in colors.
- Let it dry completely.
Tips for best results:
- Use fabric paint for durability.
- Experiment with stencils for detailed designs.
- Practice on scrap fabric first.
Model Making And Detailing
Airbrushing can enhance your model-building skills. Whether it’s planes, cars, or figures, details matter. Here’s how to get started:
| Step | Description |
|---|---|
| 1 | Choose your model kit. |
| 2 | Prepare the model surface. |
| 3 | Use primer for a smooth base. |
| 4 | Apply airbrush paint in layers. |
| 5 | Add final touches with details. |
Benefits of airbrushing models:
- Achieve smooth finishes.
- Create realistic shading.
- Use multiple colors easily.
Culinary Art: Decorating Cakes
Turn cakes into masterpieces with airbrushing. This technique adds flair to your baking. Follow these easy steps:
- Choose a cooled cake.
- Cover with a base layer of icing.
- Mix food coloring in the airbrush.
- Spray color onto the cake gently.
- Let it set before serving.
Tips for cake decorating:
- Use edible colors for safety.
- Practice on parchment paper first.
- Keep airbrush clean for best results.
Advanced Airbrush Skills
Mastering advanced airbrush skills opens a world of creative possibilities. With the right techniques, you can create stunning art. This section explores mixing custom paints, freehand airbrushing, and using stencils and masks.
Mixing Custom Paints
Custom paint mixing is essential for unique artwork. It allows you to achieve specific colors and effects. Follow these steps to mix your own paints:
- Gather Materials: Use airbrush paints and a mixing cup.
- Start with Base Color: Add the primary color first.
- Add Secondary Colors: Gradually mix in other colors.
- Test and Adjust: Spray a test pattern to check color.
- Store Properly: Keep mixed paints in airtight containers.
Custom colors enhance your art. Experiment with different combinations for amazing results.
Freehand Airbrushing
Freehand airbrushing gives you full creative control. It lets you create intricate designs without tools. Here’s how to improve your freehand skills:
- Practice Control: Start with simple shapes.
- Use Reference Images: Observe real-life subjects.
- Vary Air Pressure: Adjust the compressor for different effects.
- Layer Gradually: Build up color in thin layers.
- Experiment: Try different techniques and styles.
Freehand airbrushing showcases your unique style. It requires practice and patience.
Using Stencils And Masks
Stencils and masks help create sharp designs. They offer precision for detailed work. Follow these tips for effective use:
| Technique | Description |
|---|---|
| Stenciling | Place stencil on the surface and spray over it. |
| Masking | Cover areas with tape for clean lines. |
| Layering | Use multiple stencils for complex designs. |
Using stencils and masks enhances precision. They help you achieve professional-looking results.

Credit: www.amazon.com
Maintaining Your Equipment
Proper maintenance of your airbrush air compressor kit ensures longevity. Clean equipment works better and provides better results. Follow these simple tips to keep your kit in top shape.
Cleaning And Storage
Regular cleaning is vital for optimal performance. Dust and paint can accumulate and affect functionality.
- Daily Cleaning: Wipe down the compressor after each use.
- Deep Cleaning: Every month, use a soft brush to clean internal parts.
- Storage: Store the compressor in a cool, dry place.
Use a protective cover to prevent dust accumulation. Ensure all parts are dry before storing.
When To Replace Parts
Some parts wear out over time. Knowing when to replace them can save you trouble.
| Part | Signs of Wear | Replacement Frequency |
|---|---|---|
| Air Filter | Discoloration or clogging | Every 3-6 months |
| Hoses | Cracks or leaks | Annually |
| Regulator | Inaccurate pressure readings | Every 2 years |
Troubleshooting Air Compressor Problems
Issues may arise with your air compressor. Knowing how to troubleshoot helps keep your kit functional.
- No Air Output: Check for clogs in the air filter.
- Unusual Noises: Inspect for loose parts or debris.
- Inconsistent Pressure: Ensure the regulator is working correctly.
Keep a manual handy for further guidance. Regular checks prevent major issues.
Frequently Asked Questions
What Is An Airbrush Air Compressor Kit?
An airbrush air compressor kit is a complete system for airbrushing. It includes an air compressor and an airbrush. These kits provide the necessary pressure for fine detail work in painting and crafting. They are ideal for artists, hobbyists, and professionals looking to achieve high-quality finishes.
How Do I Choose The Right Air Compressor?
Choosing the right air compressor depends on your needs. Consider factors like pressure output, tank size, and portability. A compressor with adjustable pressure is ideal for detailed work. Make sure it is compatible with your airbrush model. Research various brands to find the best fit for your projects.
Can I Use Any Compressor With An Airbrush?
Not all compressors are suitable for airbrush use. Airbrushes require a specific pressure range, typically between 15-30 PSI. Compressors designed for airbrushes provide consistent airflow without moisture. Using a non-compatible compressor can lead to poor results. Always check compatibility with your airbrush specifications before use.
What Accessories Come With An Airbrush Kit?
An airbrush kit typically includes an airbrush, compressor, and hose. Some kits may also feature a cleaning brush, paint cups, and a user manual. Additional accessories can enhance your experience, such as airbrush holders or cleaning solutions. Ensure you get a complete kit for optimal performance and convenience.
Conclusion
Choosing the right airbrush air compressor kit can elevate your art projects. Consider factors like noise level, portability, and power. A quality kit enhances precision and creativity. With the right tools, your artistic vision can truly come to life. Invest wisely, and enjoy the countless possibilities that await you.