To convert an old air compressor to an air tank, first remove the compressor motor. Then, cap the air inlet and outlet ports securely.
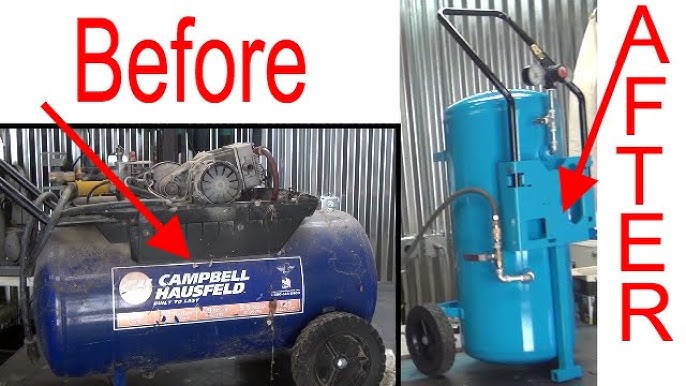
Transforming an old air compressor into an air tank can be a practical and cost-effective project. Many people have outdated compressors taking up space in their garage. Instead of discarding them, consider repurposing them as storage tanks for compressed air.
This approach not only saves money but also reduces waste, contributing to a more sustainable lifestyle. An air tank can provide a reliable source of compressed air for various tasks, including powering tools and inflating tires. With proper modifications, you can extend the life of your equipment while enhancing your workshop’s capabilities. This guide will help you through the conversion process step-by-step.
Introduction To Air Compressor Conversion
Repurposing an old air compressor into an air tank is a smart choice. This process can save money and reduce waste. An air tank can store compressed air for various uses. It is also a fun DIY project for enthusiasts.
Benefits Of Repurposing Old Equipment
Transforming an old air compressor offers several benefits:
- Cost Savings: Avoid buying new equipment.
- Environmental Impact: Reduce waste in landfills.
- Versatility: Use the air tank for different projects.
- Skill Development: Improve DIY skills through hands-on work.
Repurposing can also lead to unique solutions. You can customize the tank for specific needs. This opens up new possibilities for both hobbyists and professionals.
Safety Considerations Before Starting
Safety is crucial when converting an air compressor. Follow these guidelines:
- Disconnect Power: Unplug the compressor before starting.
- Release Pressure: Ensure the tank is empty of air.
- Wear Safety Gear: Use gloves and eye protection.
- Check for Damage: Inspect the tank for rust or leaks.
Always follow local regulations regarding compressed air. Proper handling ensures safety during the conversion process.

Credit: www.instructables.com
Essential Tools And Materials
Transforming an old air compressor into a useful air tank is an exciting project. You need the right tools and materials to make this conversion successful. Below is a detailed list to help you gather everything you need.
List Of Necessary Tools
- Wrench Set – For loosening and tightening bolts.
- Screwdriver Set – Both flathead and Phillips for different screws.
- Pliers – Useful for gripping and bending.
- Pipe Wrench – Essential for working with pipes.
- Drill – Needed for making new holes if required.
- Safety Goggles – Protect your eyes during the process.
- Gloves – To keep your hands safe and clean.
- Measuring Tape – For accurate measurements.
Materials Required For Conversion
| Material | Purpose |
|---|---|
| Old Air Compressor | Main component for conversion. |
| Air Tank | To store compressed air safely. |
| Pipe Fittings | Connect different parts of the system. |
| Hoses | To transfer air between components. |
| Sealant Tape | To prevent air leaks. |
| Pressure Gauge | To monitor air pressure levels. |
Gather these tools and materials before starting. This preparation ensures a smooth conversion process. Enjoy transforming your old air compressor into a valuable air tank!
Preparation Steps
Converting an old air compressor into an air tank is rewarding. Proper preparation ensures safety and efficiency. Follow these steps carefully.
Cleaning And Inspection
Start with a thorough cleaning of your air compressor. Dirt and grime can hide potential issues. Follow these cleaning steps:
- Unplug the compressor from the power source.
- Use a damp cloth to wipe the exterior.
- Inspect the intake filters for dust buildup.
- Check for any visible rust or damage.
After cleaning, inspect the tank. Look for:
| Inspection Item | Action Required |
|---|---|
| Rust | Remove with sandpaper and apply rust inhibitor. |
| Cracks | Replace the tank if cracks are visible. |
| Valves | Ensure valves are functioning properly. |
Disassembling The Compressor
Disassembly is crucial for conversion. Follow these steps to disassemble the compressor:
- Turn off and unplug the unit.
- Release any remaining air pressure.
- Carefully remove the screws holding the casing.
- Take off the outer casing to expose internal parts.
- Disconnect and remove the motor and pump components.
Store the parts in labeled containers. This helps keep track of everything. Handle all components with care. Safety gloves and goggles are recommended.
Removing The Motor And Pump
Removing the motor and pump is crucial for converting an old air compressor into an air tank. This process involves careful steps to ensure safety and efficiency. Follow these simple instructions to effectively detach these components.
Step-by-step Motor Removal
- Unplug the Compressor: Ensure the unit is disconnected from any power source.
- Gather Tools:
- Socket wrench
- Screwdriver
- Safety goggles
- Gloves
- Remove the Cover: Unscrew the outer cover to access the motor.
- Disconnect Wires:
- Identify the motor’s electrical connections.
- Carefully disconnect the wires.
- Unscrew the Motor: Use a socket wrench to remove motor bolts.
- Lift the Motor: Carefully lift the motor away from the tank.
Pump Disconnection Procedure
After removing the motor, the next step is to disconnect the pump. Follow these steps for a safe disconnection:
- Locate the Pump: Find the pump attached to the tank.
- Check for Fasteners: Identify any screws or bolts holding the pump.
- Remove Fasteners: Use the screwdriver to take out screws.
- Detach the Pump: Carefully pull the pump away from the tank.
- Inspect for Damage: Check both pump and tank for any issues.
Ensure all components are set aside safely for later use.
Sealing And Modifying The Tank
Transforming an old air compressor into a functional air tank requires careful sealing and modification. Proper sealing ensures air retention and safety. Follow these steps to create effective air inlets and outlets.
Creating Air Inlets And Outlets
Air inlets and outlets are crucial for air flow. Here’s how to create them:
- Identify the right locations on the tank.
- Use a drill to create holes for the inlets and outlets.
- Choose fittings that match your air hoses.
- Securely attach the fittings using appropriate tools.
Consider using threaded fittings for better sealing. Ensure no air can escape through the connections.
Sealing Techniques
Effective sealing prevents air leaks. Use these techniques for best results:
- Thread Sealant: Apply on threaded areas to enhance sealing.
- Silicone Sealant: Use for smooth surfaces. Let it cure fully.
- Gasket Material: Place between joints for extra sealing.
Check for leaks after sealing. Use soapy water to identify any escaping air. This ensures a safe and efficient air tank.

Credit: m.youtube.com
Installing Fittings And Hoses
Transforming an old air compressor into an air tank requires proper fittings and hoses. This section will guide you on choosing and installing these components effectively.
Choosing The Right Fittings
Fittings connect the air tank to the air tools. Selecting the right fittings is crucial for safe operation. Here are some key points to consider:
- Material: Choose brass or steel fittings for durability.
- Size: Ensure fittings match the hose diameter.
- Thread Type: Use NPT (National Pipe Thread) for secure connections.
Here’s a quick reference table for common fitting sizes:
| Fitting Type | Size (inches) |
|---|---|
| 1/4″ NPT | 1/4 |
| 3/8″ NPT | 3/8 |
| 1/2″ NPT | 1/2 |
Hose Installation Guide
Installing hoses correctly ensures efficient air flow. Follow these steps for a successful installation:
- Measure Length: Determine the distance from the tank to the tool.
- Select Hose: Use a hose rated for your compressor’s pressure.
- Cut Hose: Cut the hose to the required length.
- Attach Fittings: Securely attach fittings to both ends of the hose.
- Test for Leaks: Turn on the compressor and check for air leaks.
Use these tips to ensure a strong connection:
- Use Teflon tape for threaded connections.
- Check for tightness after installation.
- Inspect hoses regularly for wear and tear.
Pressure Testing The Tank
Pressure testing an old air compressor tank is vital. This process ensures safety and functionality. A thorough test checks for leaks and structural integrity. Follow the steps carefully for a successful test.
Safety Test Procedures
Safety is the top priority during pressure testing. Follow these procedures to stay safe:
- Wear safety goggles and gloves.
- Work in a well-ventilated area.
- Keep a fire extinguisher nearby.
- Do not exceed the tank’s maximum pressure rating.
Use a reliable pressure gauge. Check connections and fittings. Ensure no rust or corrosion is present. Always work with a partner for added safety.
Identifying And Fixing Leaks
Finding leaks is crucial for a safe air tank. Here’s how to identify and fix them:
- Pressurize the tank slowly.
- Use a soap solution on all joints and seams.
- Watch for bubbles, which indicate leaks.
For small leaks:
- Apply a sealant or epoxy.
- Re-test after repairs.
For larger leaks, consider welding or replacement. Always ensure the tank is depressurized before any repairs.
| Leak Size | Recommended Action |
|---|---|
| Small | Seal with epoxy |
| Medium | Weld or replace section |
| Large | Replace entire tank |
Proper leak identification and repair keep the air tank safe. Regular checks extend the tank’s lifespan.
Final Assembly And Mounting
Completing the conversion of an old air compressor into an air tank requires careful assembly and secure mounting. Follow these steps to ensure a safe and effective setup.
Assembling The Components
Gather all necessary parts before starting the assembly. Here’s a list of items you will need:
- Old air compressor
- Air tank fittings
- Hoses and connectors
- Pressure gauge
- Mounting brackets
- Tools (wrenches, screwdrivers, etc.)
Start by removing the old compressor motor. You will focus on the tank only. Clean the tank thoroughly to remove any rust or debris. This step ensures a good seal.
Next, attach the air tank fittings securely. Use a wrench to tighten each fitting. Install the pressure gauge on the tank. This gauge shows the air pressure inside.
Connect the hoses to the fittings. Make sure all connections are tight to prevent leaks. Test the connections with soapy water. Look for bubbles, which indicate leaks.
Mounting And Stabilizing The Tank
Mounting the air tank is crucial for safety. Choose a stable location for installation. Follow these steps for effective mounting:
- Determine the best spot for the tank.
- Use mounting brackets to secure the tank.
- Attach the tank to the wall or a sturdy base.
- Ensure the tank is level and stable.
- Double-check all connections before use.
To stabilize the tank further, consider using rubber pads. These pads can absorb vibrations. This reduces the risk of damage over time.
Always keep safety in mind. Ensure that the tank is away from heat sources. Regularly inspect the tank for any signs of wear or damage.
Maintenance Tips For Your New Air Tank
Keeping your air tank in good shape is essential. Regular maintenance ensures safety and efficiency. Here are some helpful tips to maintain your new air tank.
Routine Check-up Suggestions
Regular inspections help catch issues early. Follow these simple steps:
- Inspect for leaks: Check all connections and fittings.
- Check pressure levels: Use a pressure gauge for accuracy.
- Clean the exterior: Dust and debris can cause rust.
- Drain moisture: Release condensation from the tank regularly.
Long-term Care Advice
Taking care of your air tank helps it last longer. Consider these tips:
- Store properly: Keep it in a dry, cool place.
- Use a rust inhibitor: Apply it to the tank surface.
- Check the manual: Follow the manufacturer’s guidelines.
- Replace worn parts: Address any damaged components.
Following these maintenance tips will keep your air tank working well. Regular care leads to safer operation and longer life.
Credit: www.vmacair.com
Creative Uses For Your Converted Air Tank
Transforming an old air compressor into an air tank opens up many exciting possibilities. You can use your newly converted air tank in various creative and practical ways. Here are some engaging ideas to inspire you.
Diy Project Ideas
- Air-Powered Tools: Use your air tank to power pneumatic tools.
- Paint Sprayer: Convert it into a paint sprayer for smooth finishes.
- Air Blower: Create a blower for cleaning debris and dust.
- Inflatable Items: Inflate balloons, pool toys, and more.
- Airbrush Station: Set up a dedicated station for airbrushing crafts.
Industrial Applications
| Application | Description |
|---|---|
| Dust Collection: | Connect to a dust collection system for cleaner workspaces. |
| Automotive Repairs: | Power air tools for efficient automotive repairs. |
| Pressure Testing: | Use for pressure testing pipes and tanks. |
| Spray Coating: | Apply coatings with a spray gun for smooth finishes. |
Repurposing your old air compressor into an air tank is rewarding. These creative uses enhance productivity and add fun to projects. Explore these ideas to get started on your next venture!
Frequently Asked Questions
How Can I Repurpose An Old Air Compressor?
You can convert an old air compressor into an air tank by removing the compressor components. First, ensure safety by disconnecting it from power. Then, clean the tank, seal any leaks, and add necessary fittings for air tools. This process enhances utility and prolongs the equipment’s life.
Is It Safe To Use An Old Air Tank?
Using an old air tank can be safe if properly inspected. Check for rust, cracks, or leaks before repurposing. Always follow safety guidelines and use pressure gauges to monitor air levels. Regular maintenance will ensure it operates safely and efficiently.
What Tools Do I Need For Conversion?
For conversion, you’ll need basic hand tools like wrenches, screwdrivers, and a drill. Additionally, safety equipment like gloves and goggles is essential. Depending on your setup, you might also require fittings and hoses. Gather all necessary tools before starting the conversion process for efficiency.
Can I Use The Tank For Different Air Tools?
Yes, once converted, the tank can be used for various air tools. It’s ideal for nail guns, spray guns, or airbrushes. Ensure the tank is appropriately pressurized for the tools you intend to use. Always check the specifications to match the tool requirements with the tank’s capabilities.
Conclusion
Transforming an old air compressor into an air tank is both practical and eco-friendly. This project can save money while optimizing your workspace. With the right tools and techniques, anyone can achieve this conversion. Embrace this DIY challenge and enjoy the benefits of a custom air storage solution tailored to your needs.