Certainly! Below is a detailed, publication-ready article on “Air Compressor for Auto Detailing under $1000 for Beginners. ” The content is designed for non-native English readers, using simple language and clear explanations, and follows your markdown and section rules exactly.
—
Auto detailing can turn a normal car into something that feels almost new. The key to great results is having the right tools, and an air compressor is one of the most useful tools for both beginners and experienced detailers.
If you are just starting and want to buy your first air compressor under $1000, it’s important to understand what matters, what features to look for, and how to use one safely and effectively. This guide will help you make a smart choice, avoid common mistakes, and get the best results for your money.
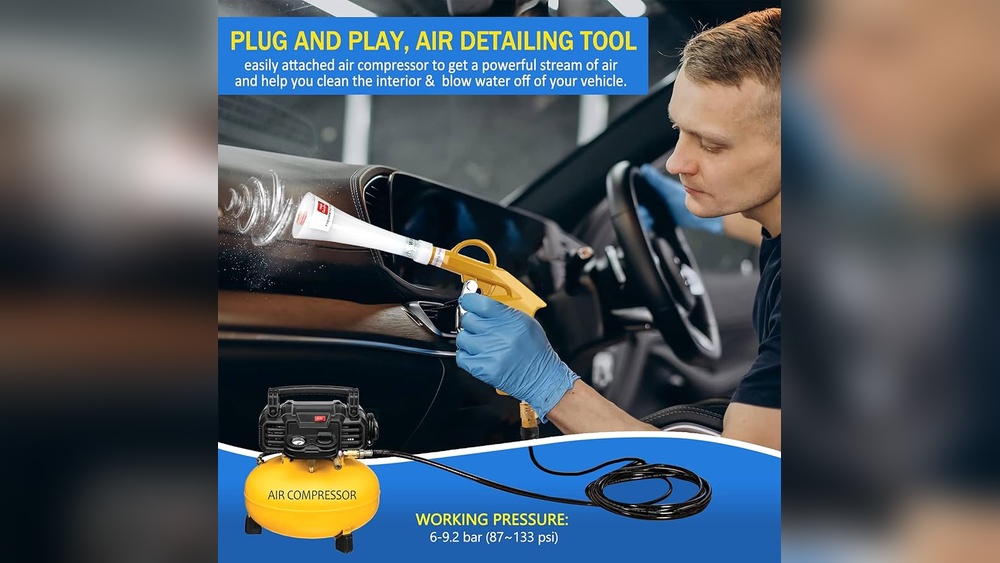
Why Use An Air Compressor For Auto Detailing?
Many beginners wonder if they really need an air compressor. After all, you can wash and clean a car with simple tools. But auto detailing is more than just washing. It’s about cleaning every small spot, removing dust, and making surfaces shine.
An air compressor gives you power and speed to do jobs that are difficult by hand.
For example, compressed air can blow out dirt from air vents, under seats, and between car panels—places that are hard to reach with brushes or cloths. It can also help dry car surfaces quickly, especially after washing or cleaning carpets.
If you use tools like a Tornador or a foam cannon, you need an air compressor to run them.
Air compressors are not just for professionals. Even for beginners, they can save time and energy, and make your work look more professional. You will notice a big difference in how clean your car looks and how fast you can finish the job.
What To Look For In An Air Compressor For Auto Detailing
Choosing the right air compressor can feel confusing because there are many models and features. But not all features are equally important for auto detailing. Here’s what really matters:
1. Air Pressure (psi)
PSI means “pounds per square inch. ” It tells you how much pressure the compressor can deliver. For most auto detailing tools, 90–120 PSI is enough. If you want to use tools like the Tornador Black or a blow gun, they work best at pressures above 90 PSI.
Practical tip: More PSI does not always mean better. If you only use your compressor for blowing dust or drying, you don’t need 150+ PSI. Focus on stable and reliable pressure, not just the highest number.
2. Air Flow (cfm)
CFM means “cubic feet per minute. ” It measures how much air the compressor can deliver. Some tools, like air blow guns, need more air (high CFM), while others like inflators need less.
A good rule: For most auto detailing tasks, look for at least 4–6 CFM at 90 PSI. If you want to run two tools at the same time, you may need more.
Beginner insight: Many people buy a compressor with high PSI but low CFM. This means the compressor can’t keep up with the tool, and you have to stop and wait for it to refill. Always check CFM for the pressure you will use.
3. Tank Size
Tank size is measured in gallons. A bigger tank (20–30 gallons) means you can use air tools longer without waiting for the compressor to refill. For mobile detailers, a 6–10 gallon tank is easier to move, but you may need to pause during long jobs.
If you work mostly at home, a 20–30 gallon tank is a good balance. If you need something portable, choose 6–10 gallons but expect more breaks.
Pro tip: Don’t buy a huge tank “just in case.” Larger tanks are heavy, take up space, and may not be necessary for short or simple jobs.
4. Oil-free Vs. Oil-lubricated
Oil-free compressors are easier to use and require less maintenance. They are quieter, lighter, and less messy. For beginners, oil-free is usually the best choice.
Oil-lubricated compressors last longer and are better for very heavy use, but they need regular oil checks and changes. If you plan to use the compressor for many hours every day, consider oil-lubricated. Otherwise, oil-free is perfect.
5. Portability And Noise
If you move your compressor often or work in small spaces, choose a model with wheels and a handle. Also, check the noise level (measured in decibels, dB). Compressors can be loud—quiet models are better for indoor or residential areas.
Non-obvious insight: Many beginners buy the most powerful compressor they can afford, but later realize it’s too loud or heavy for their garage.
6. Price Vs. Value
There are many compressors under $1000, but quality and value can be very different. Avoid buying the absolute cheapest model—it may not last, and parts can be hard to find. Instead, look for a well-known brand with good support and warranty.
Example: Spending $300–$700 usually gets you a reliable, easy-to-use compressor for auto detailing. If you spend less than $200, you may have trouble with power or durability.
Credit: www.kirbyssupersports.com
Top 8 Air Compressors For Auto Detailing Under $1000
Here are eight recommended air compressors for beginners. Each one offers good value, performance, and support. These models are widely available and have strong reviews from both beginners and experienced users.
1. California Air Tools 8010
- 8-gallon tank
- Oil-free pump
- 2.2 CFM at 90 PSI
- Ultra-quiet (60 dB)
- Weighs 48 lbs
Why it’s good: The 8010 is famous for its quiet operation. You can use it in a garage without disturbing neighbors. The 8-gallon size is enough for most detailing tasks, and the oil-free design means less maintenance. It’s easy to move, and parts are available if you need repairs.
What beginners miss: Many users forget to drain the tank after use. Even oil-free compressors need this to prevent rust.
2. Dewalt Dxcm271.com
- 27-gallon tank
- Oil-free pump
- 5.1 CFM at 90 PSI
- 78 dB noise level
- Durable wheels and handle
Why it’s good: This model is great if you want a larger tank for longer jobs. It delivers high CFM and reliable pressure for tools like the Tornador or foam cannon. It’s still portable, but heavier than small models.
Watch out: Make sure you have space for storage—27 gallons takes up room. Also, always check the power supply; this needs a standard 120V outlet but draws more current.
3. Makita Mac2400 Big Bore
- 4.2-gallon twin-stacked tank
- Oil-lubricated pump
- 4.2 CFM at 90 PSI
- 79 dB noise level
- Built-in air filter
Why it’s good: Makita compressors are famous for reliability. The MAC2400 has a special “big bore” cylinder for more air and less noise. It’s smaller but strong enough for most detailing tools.
Non-obvious tip: Because it’s oil-lubricated, always check the oil level before use. Missing this can cause damage.
4. Porter-cable C2002
- 6-gallon pancake tank
- Oil-free pump
- 2.6 CFM at 90 PSI
- 82 dB noise level
- Very portable (34 lbs)
Why it’s good: For beginners who want something light and simple, this is a strong choice. It’s easy to carry, quick to set up, and works for basic detailing tasks.
Limitation: The small tank means you may have to pause during long jobs. Best for short or mobile use.
5. Industrial Air Il1682066.mn
- 20-gallon tank
- Oil-lubricated pump
- 6.2 CFM at 40 PSI / 5.3 CFM at 90 PSI
- 78 dB noise level
- Cast iron cylinder
Why it’s good: This compressor is designed for heavy use. It’s a bit heavier but gives steady power for longer jobs. If you plan to detail cars often, this is a great investment.
Beginner mistake: Oil-lubricated means regular maintenance. Don’t skip reading the manual on oil changes.
6. Campbell Hausfeld Dc080500
- 8-gallon tank
- Oil-free pump
- 2.4 CFM at 90 PSI
- Ultra-quiet (68 dB)
- Easy to move (54 lbs)
Why it’s good: This model is quiet and light, perfect for home garages or small shops. It has enough power for most cleaning and drying tools.
Hidden insight: The hose and fittings included may not fit all detailing tools. You may need to buy an adapter.
7. Bostitch Btfp02012
- 6-gallon pancake tank
- Oil-free pump
- 2.6 CFM at 90 PSI
- 80 dB noise level
- Only 29 lbs
Why it’s good: Very light and compact, easy to carry to jobs or move around your garage. Great for beginners who want to try air tools without a big investment.
Downside: Like other small tanks, you need to wait for it to refill during long jobs.
8. Stealth Saq-1512
- 12-gallon tank
- Oil-free pump
- 4 CFM at 90 PSI
- Very quiet (68 dB)
- Large wheels for easy moving
Why it’s good: This is a strong middle-size option. It’s quiet, has enough air for longer jobs, and is easy to move. Good for both home and mobile detailers.
Extra tip: The larger wheels make it easier to move over rough ground or driveways.
Common Mistakes Beginners Make
Even with a good air compressor, many beginners make simple mistakes. These can waste time, damage tools, or even be unsafe. Here are the most common problems—and how to avoid them.
1. Ignoring Maintenance
Some beginners think oil-free means “no maintenance. ” But all compressors need regular checks. Drain the tank after every use to stop rust. Check for leaks, and clean filters if your model has them.
Practical example: If you leave water inside the tank, rust will start inside. Over time, this can make the tank unsafe.
2. Using The Wrong Hose Or Fittings
Not all air hoses are the same. If you use a thin or old hose, you may not get enough air for your tools. Always use a hose rated for your compressor’s pressure, and check that fittings are tight.
Beginner tip: Buy a good-quality hose (at least 3/8″ diameter) for best results.
3. Overloading The Compressor
Trying to run two high-demand tools at once can overload the compressor. This makes it hot and shortens its life. Always check the CFM needed for your tools, and don’t go over your compressor’s rating.
4. Not Checking Power Requirements
Some large compressors need special power outlets. If you plug a big compressor into a normal outlet, it may trip your breaker or run poorly. Read the manual before plugging in.
Non-obvious tip: If you use an extension cord, make sure it’s heavy-duty and short. Long, thin cords can cause voltage drops and damage the compressor.
5. Skipping Safety Steps
Compressed air is powerful. Never point the air gun at yourself or others. Always wear safety glasses. If you clean inside your car, open the doors to let dust escape.
6. Not Matching Tools And Compressor
Some air tools need more air than small compressors can provide. If your tool stops working or loses power, check if your compressor is big enough. Always check CFM and PSI before buying new tools.
How To Use An Air Compressor For Detailing
Now that you have the right compressor, how do you use it safely and effectively? Here’s a step-by-step guide:
1. Set Up The Compressor
- Place the compressor on a flat, dry surface.
- Plug it into the correct power outlet.
- Attach the air hose tightly to the compressor.
- If needed, add oil (oil-lubricated models only).
- Turn on the compressor and let it fill the tank.
Tip: Watch the pressure gauge. Wait until the compressor reaches the right PSI before using your tools.
2. Connect Your Tool
- Attach the tool (such as a blow gun or foam cannon) to the other end of the hose.
- Make sure all connections are tight to stop leaks.
3. Adjust Pressure
- Set the regulator to the right PSI for your tool.
- Start with a lower pressure and increase slowly if needed.
- Never go above the tool’s maximum rating.
4. Use The Tool
- Hold the tool safely, and keep fingers away from the nozzle.
- If blowing out dust, keep the nozzle a few inches from the surface.
- For drying, move the air stream smoothly across the area.
5. Finish And Clean Up
- Turn off the tool and compressor.
- Unplug the compressor.
- Disconnect and store the hose and tools.
- Open the tank drain to release any water inside.
Best Accessories For Auto Detailing
A good compressor is only part of the setup. Here are some accessories that make detailing easier and better.
1. Blow Gun
A blow gun helps you clean vents, cracks, and hard-to-reach spots. It’s simple but very effective.
2. Tornador Cleaning Tool
This tool mixes air and cleaning solution to spray a powerful mist. It’s great for carpets, seats, and fabric.
3. Foam Cannon
A foam cannon sprays thick soap foam onto the car, making washing easier. You need a compressor with enough CFM to use it well.
4. Detailing Brushes
Brushes help loosen dirt in vents and seams. Use them with compressed air to get a deep clean.
5. Quick-connect Fittings
These fittings let you switch tools quickly without unscrewing the hose each time.
6. Extension Hose
A longer hose helps you reach all around the car without moving the compressor.

Credit: www.amazon.com
Safety Tips For Beginners
Air compressors are safe if you use them correctly, but they can be dangerous if you ignore basic rules.
- Always wear eye protection.
- Never point air at people or pets.
- Keep hands and hair away from moving parts.
- Never use a damaged hose or fitting.
- Store the compressor in a dry place.
- Drain the tank after every use.
- Read the manual before using new tools.
Extra insight: Compressed air can push small objects at high speed. Keep your workspace clean to avoid accidents.
When To Upgrade Your Compressor
Most beginners start with a small or mid-size compressor. As you gain experience, you may want more power or features. Here are signs it’s time to upgrade:
- You want to use two or more tools at the same time.
- Your current compressor runs out of air too quickly.
- You plan to detail cars professionally.
- You need quieter operation for indoor work.
If you upgrade, don’t throw away your old compressor. You can use it as a backup, or for small jobs like inflating tires.

Credit: www.walmart.com
Where To Learn More
Learning auto detailing takes time, and the right air compressor is just one step. Many online resources offer free guides, videos, and forums where you can ask questions. One helpful place is the [Autogeek Online Forum](https://www.autogeekonline.net/forum/), where detailers of all skill levels share advice and reviews.
Final Thoughts
Buying an air compressor for auto detailing under $1000 is a smart investment. It saves time, improves results, and opens up new tools and techniques. Focus on the features that matter: PSI, CFM, tank size, and portability. Avoid common mistakes by reading the manual, maintaining your equipment, and matching the compressor to your tools.
Most important, start simple and grow as you learn. You don’t need the biggest or most expensive compressor to get professional results. With the right setup, even beginners can achieve a clean, shiny car that feels like new.
Remember, the best compressor is the one that fits your needs, space, and budget. Take your time, ask questions, and enjoy the process of learning auto detailing.