
To adjust the cut-out pressure on an air compressor, locate the pressure switch and turn the appropriate adjustment screw. Ensure the compressor is off before making adjustments.
Adjusting the cut-out pressure on an air compressor is crucial for optimal performance and safety. The pressure switch controls when the compressor stops pumping air, ensuring the system maintains a safe operating pressure. Incorrect settings can lead to inefficiency or damage.
Start by ensuring the compressor is turned off and unplugged. Locate the pressure switch, typically found near the tank. Identify the cut-out pressure adjustment screw, often marked with a “P” or similar label. Turn the screw clockwise to increase the pressure or counterclockwise to decrease it. Test the adjustments by running the compressor and monitoring the pressure gauge.

Tools Needed
Adjusting the cut-out pressure on your air compressor ensures it works efficiently. To do this, you’ll need specific tools to get the job done right. Below, we detail the essential tools needed for the task.
Basic Tools
You’ll require some basic tools to adjust the compressor pressure switch. Here are the essential items:
- Screwdrivers: Both flathead and Phillips types.
- Wrench Set: To loosen and tighten nuts and bolts.
- Multimeter: For checking electrical connections.
- Adjustable Pliers: For gripping and turning components.
Safety Equipment
Safety is crucial when working with air compressors. Ensure you have the following safety equipment:
- Safety Glasses: Protect your eyes from debris.
- Gloves: Shield your hands from sharp edges.
- Hearing Protection: Prevent ear damage from loud noises.
- Face Mask: Guard against dust and particles.
Safety Precautions
Adjusting the cut-out pressure on an air compressor requires careful attention to safety. Ensuring safety during this process is crucial to prevent accidents. Follow these precautions to safeguard yourself and your equipment.
Pre-adjustment Checks
Before making any adjustments, always perform pre-adjustment checks. This ensures the compressor is safe to work on:
- Turn off the compressor and unplug it.
- Release any pressure in the tank.
- Check for any visible damage or leaks.
- Ensure the area is well-ventilated and free from flammable materials.
Handling Pressurized Components
Pressurized components can be dangerous. Handle them with care:
- Wear safety goggles and gloves.
- Do not tamper with the pressure switch while the compressor is running.
- Use proper tools to adjust the pressure switch.
- Double-check all connections before turning the compressor back on.
Following these safety precautions will help you adjust the cut-out pressure safely. Always prioritize safety to avoid injuries and equipment damage.
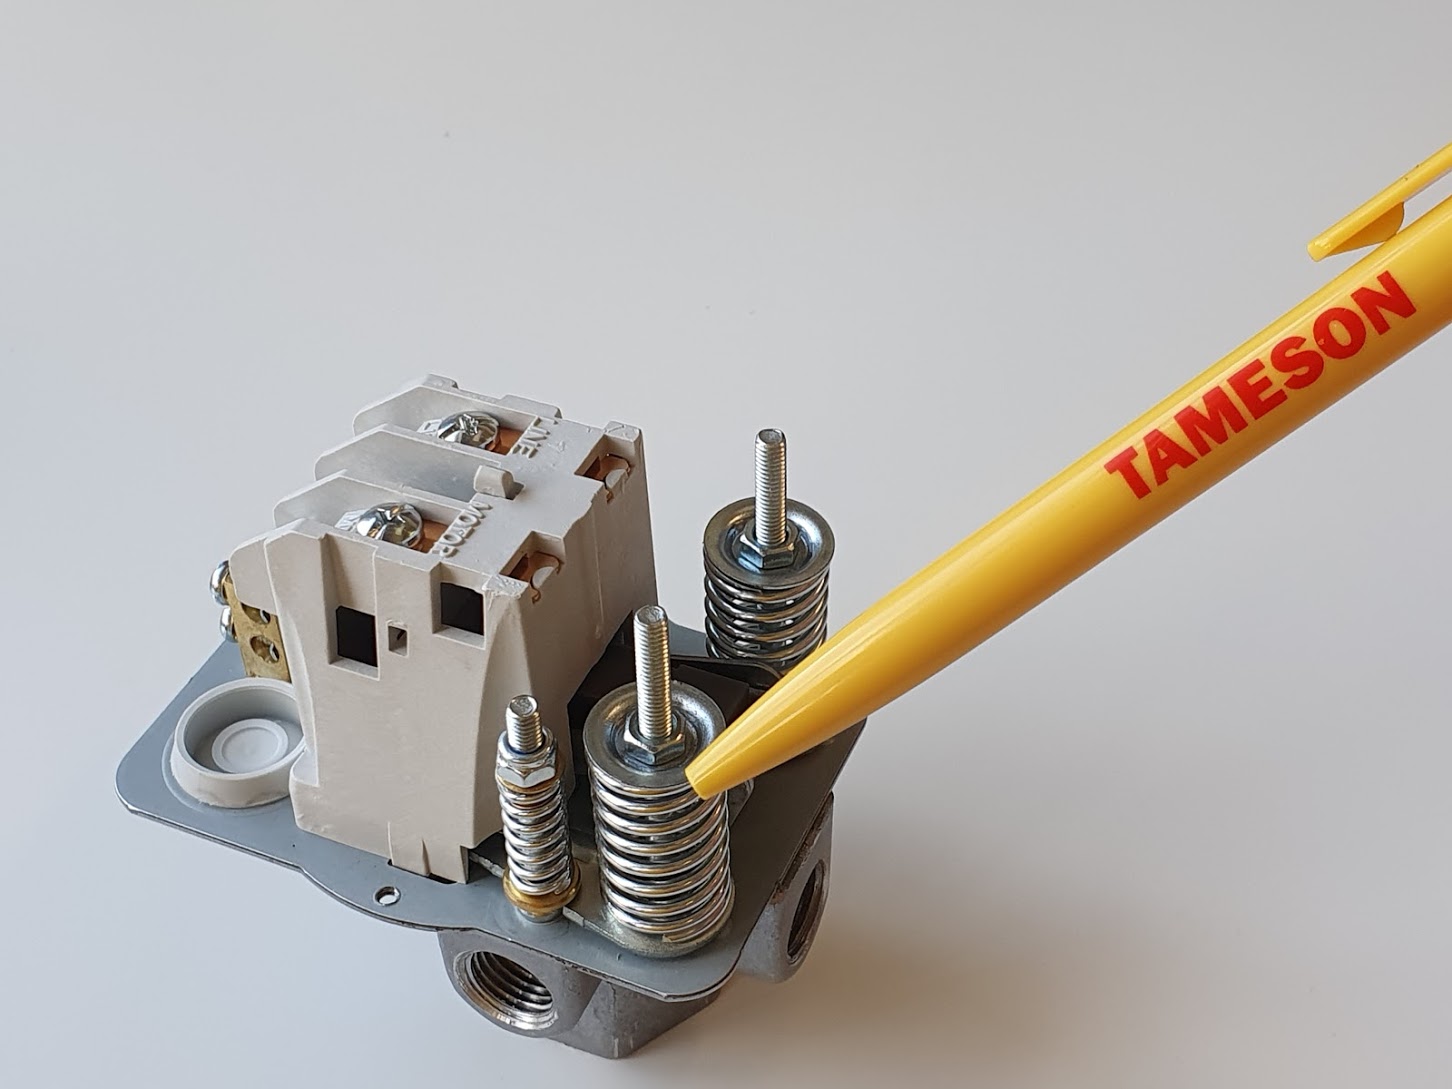
Locating The Pressure Switch
To adjust the cut-out pressure on your air compressor, you need to locate the pressure switch first. The pressure switch is a crucial component. It helps in controlling the compressor’s functioning by regulating pressure levels.
Identifying The Switch
The pressure switch is usually housed in a small box. It has a cover, often made of plastic or metal. Look for a box attached to the compressor’s main body. The switch typically has wires connected to it. These wires help in monitoring the pressure levels.
Use the diagram in your compressor’s manual. It will show the exact location. This helps in avoiding confusion. If you can’t find it, check near the motor or tank.
Understanding Switch Components
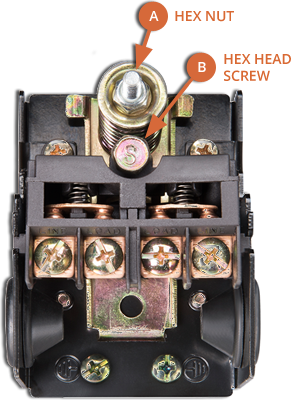
Once you have identified the switch, understanding its components is essential. The switch has several parts:
- Pressure Adjustment Screw: This screw helps in setting the cut-out pressure.
- Cover: Protects the internal components from damage.
- Diaphragm: A flexible membrane that senses pressure changes.
Each component plays a critical role. Knowing these parts makes it easier to adjust the pressure.
To access the components, remove the cover. Be careful while doing this. Use a screwdriver to unscrew the cover. Keep the screws in a safe place to avoid losing them.
Now, you are ready to adjust the pressure switch. Ensure the compressor is turned off before making any adjustments. This ensures your safety.
Adjusting The Cut-out Pressure
Adjusting the cut-out pressure on your air compressor ensures it works efficiently. It prevents over-pressurization, which can damage the compressor. Proper adjustment helps maintain optimal performance and extends the compressor’s lifespan.
Accessing The Adjustment Screw
Locate the compressor’s pressure switch housing. This is usually a small box near the tank. Remove the cover to expose the internal components. You will see an adjustment screw inside the housing.
Safety first: Unplug the compressor before starting. Use a flashlight if needed to see clearly. Make sure you have the right tools at hand.
Turning The Screw
Turn the adjustment screw to change the cut-out pressure. Clockwise turns increase the pressure. Counterclockwise turns decrease it. Make small adjustments to avoid drastic changes.
Check the pressure gauge while turning the screw. Make sure the compressor is off to avoid accidents. After adjusting, replace the cover securely.
Plug the compressor back in and turn it on. Let it run until it reaches the new cut-out pressure. Observe the pressure gauge to ensure it stops at the desired level. If needed, make further adjustments by repeating the steps above.
| Steps | Description |
|---|---|
| 1 | Unplug the compressor for safety. |
| 2 | Remove the pressure switch cover. |
| 3 | Locate and turn the adjustment screw. |
| 4 | Check the pressure gauge for changes. |
| 5 | Replace the cover and test the compressor. |
Maintaining the correct cut-out pressure is crucial. It ensures the air compressor runs smoothly. Regular checks and adjustments can save you from costly repairs.
Testing The Adjustment
After adjusting the cut-out pressure on your air compressor, it’s crucial to test the adjustment. Testing ensures the compressor operates efficiently and safely. Follow the steps below to verify your settings.
Running The Compressor
First, ensure all connections are secure. Plug in the air compressor and switch it on. Observe the compressor as it begins to run.
Checking Pressure Levels
Monitor the pressure gauge closely. Watch as the pressure builds up to the set cut-out level. The compressor should stop once the desired pressure is reached.
If the compressor continues running past the set pressure, turn it off immediately. Double-check your adjustment settings and try again.
Repeat the process until the compressor stops at the correct cut-out pressure.
Note: Regularly check the pressure switch to ensure it remains accurate over time.
Troubleshooting Common Issues
Adjusting the cut-out pressure on your air compressor can sometimes lead to issues. It’s crucial to identify and fix these problems quickly. This section will help you troubleshoot common issues.
Pressure Too High Or Low
If the pressure is too high, the compressor may overheat. This can damage the unit. To fix this, check the pressure switch setting. Ensure it matches the manufacturer’s guidelines.
If the pressure is too low, the tools may not work properly. Adjust the cut-in and cut-out settings on the pressure switch. Use a wrench to turn the adjustment screws. Turn clockwise to increase pressure. Turn counterclockwise to decrease it.
No Change In Pressure
If there is no change in pressure after adjustments, check for blockages. Ensure the air filter is clean. A dirty filter can restrict airflow. Replace it if necessary.
Inspect the pressure switch for damage. A faulty switch can fail to respond. Replace the switch if it is damaged. Also, check the compressor’s power supply. Ensure it is stable and reliable.
| Issue | Possible Cause | Solution |
|---|---|---|
| Pressure Too High | Incorrect Switch Setting | Adjust Switch to Manufacturer’s Guidelines |
| Pressure Too Low | Improper Switch Setting | Adjust Cut-In and Cut-Out Settings |
| No Change in Pressure | Blockages or Faulty Switch | Clean Filter or Replace Switch |
Maintenance tips
Maintaining your air compressor ensures it runs smoothly and efficiently. Regular care helps prevent costly repairs and downtime. Below are some essential maintenance tips to keep your air compressor in top shape.
Regular Inspections
Conducting regular inspections is crucial for identifying potential issues early. Check for leaks, unusual noises, and vibrations. Ensure the pressure switch is functioning correctly.
- Inspect Hoses and Connections: Look for cracks or wear in hoses.
- Check Oil Levels: Ensure the oil is clean and at the correct level.
- Monitor Air Filters: Clean or replace air filters regularly.
Replacing Worn Parts
Replacing worn parts is necessary to maintain optimal performance. Components like valves, seals, and belts wear out over time.
| Part | Signs of Wear | Recommended Action |
|---|---|---|
| Valves | Decreased pressure, strange noises | Replace if damaged |
| Seals | Leaks, reduced efficiency | Replace if cracked or worn |
| Belts | Slipping, fraying | Replace if worn |
Following these maintenance tips will help your air compressor last longer. Keeping it in good condition will ensure it works efficiently when you need it most.
Frequently Asked Questions
How To Adjust Cut-out Pressure On An Air Compressor?
To adjust the cut-out pressure, locate the pressure switch. Use a screwdriver to turn the adjustment screw clockwise to increase pressure, or counterclockwise to decrease it. Always refer to the user manual for specific instructions.
What Is A Compressor Pressure Switch?
A compressor pressure switch controls the cut-in and cut-out pressures of the air compressor. It ensures the compressor turns on and off at the correct pressures, maintaining efficient operation and preventing damage.
Why Adjust The Compressor Pressure Switch?
Adjusting the compressor pressure switch helps optimize performance, ensuring the compressor operates within safe pressure ranges. Proper adjustment can extend compressor life, enhance efficiency, and reduce energy consumption.
What Tools Are Needed To Adjust Pressure?
You will need a screwdriver, preferably a flat-head or Phillips, depending on the pressure switch design. Always have the user manual on hand for specific instructions.
Conclusion
Mastering the adjustment of your air compressor’s cut-out pressure ensures optimal performance. Follow our guide to maintain your equipment effectively. Regularly check and adjust the pressure switch for best results. With these tips, your air compressor will run smoothly and efficiently.
Keep your tools in top condition for long-lasting use.